

- February 2, 2017
- 1 Comment
The Beginner’s Guide To Gas Welding

If you’re serious about welding, I’m sure you’ll already know the ins and outs of gas welding. For those that don’t, gas welding is not only one of the most bad-ass forms of welding but also one of the most useful.
It’s a cheap, transportable and flexible form of welding, that doesn’t require any electrical equipment, and is capable of cutting, welding and brazing most metals. In this article we’ll give you a full guide for understanding the basics to gas welding.
Safety
As we discussed in our article The Basics: Welding For Beginners, Safety in your workplace cannot be stressed enough. Especially for beginner welders. Again, we highly recommend reading Safe Work Australia’s Model Code of Practice on Welding Processes.
It gives you everything you need to know about safety standards, ensuring you end up with a perfect weld and not a pile of ashes that may have been your workshop.
If you’ve already read that though, here are a few tips before getting started with gas welding:
- Gas welding requires an Oxy-Acetylene safe outfit
- Never use Acetylene gas at a pressure over 100kPa
- Always crack open oxygen or fuel cylinders first
- Always have a fire extinguisher handy when operating
- Only open the Acetylene cylinder valve open 1 1/2 turns and keep a wrench on it
The Equipment and How it works
Gas welding works with three important parts: welding tips, mixers and the blowpipe.
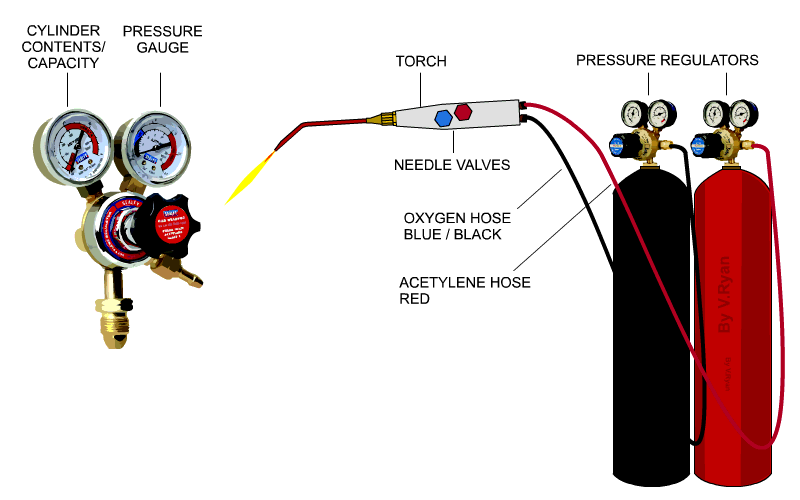
When in use, both oxygen and fuel gas are fed through the blowpipe and are mixed, exiting through the welding tips. Regulators are used to control the pressure each gas is pumped through the blowpipe and produces the flame, when met with a flint.
When Gas welding, there are a variety of different gases for different occasions. For most applications, Oxy-Acetylene (C2H2) is all you’ll really need and it’s great for welding, cutting and brazing metals. It’s also highly flammable and is the hottest commercially available fuel gas, reaching up to 480°C—which also happens to be the surface temperature of Venus.
Setting Up For Gas Welding
Once all boxes are checked, the next step is to remove any contamination which might harm or cause ignition. This is done by cracking open and closed the cylinder valve carefully, be sure to do this away from any source of ignition. Next, attach the regulators to their respective cylinders and be sure they’re tight enough to prevent any leaks.
Now, attach the other end of the hose to the blowpipe, there should be a stamp and sticker located near the handle to indicate which hose goes where. Once this is done, it’s important to do another check for leaks before lighting up.
Close the blowpipe valves and test that there are no leaks in your oxygen and fuel gas valve. Open each valve slowly, keeping only one open at the time and set the regulator to show approximately 100kPA. If there are leaks the gauge will change and you’ll need to apply leak testing solution to the valve to close the leak. Check it again and you’re good to light up.
Lighting Up

To light the blowpipe, open the oxygen valve and adjust its regulator until your required pressure is obtained. After this and before lighting, let the gas flow for a bit so it can purge the system of air. Close the valve and repeat for the Acetylene cylinder, again, refer to the pressure chart to ensure you have the correct pressure for the job.
Now it’s time for the part we’ve all been waiting for, (safely) lighting your blowtorch. Open the fuel gas valve slightly and use a flint lighter to ignite the gas, this should never be done at a gauge pressure above 100kPa.
Next, slowly open the blowpipe oxygen valve until a neutral flame is produced. For most welding jobs, a neutral flame is all you’ll need.
Gas Welding Techniques
Occasionally, your blowtorch will try to talk to you by backfiring (a small explosion at the blowpipe tip). If this happens your gas flow may be insufficient for the tip, the tip may be too hot and needs a break or there can be particles of carbon or metal stuck inside the tip (requiring a cleaning).
Holding the blowpipe in a forehand position will generally feel more natural and its best used at an 60-76 degree angle to the job. That being said, this can vary depending on the tip size and metal thickness, for example 30-45 degrees is required for metals other than mild steels.
Moving the blowpipe in a circular motion is also common practice, but be sure to never go outside the weld puddle and the tip of your pipe should be 2-3mm above the metal.
As your weld puddle carries along the seam, keep an eye on the diameter of the puddle. A greater diameter will mean greater penetration and thus a better weld. The puddle will also hint you on whether you need to adjust your movement speed or flame size and whether a filler rod may be required.
A majority of the time, you will be welding with filler material or rod to strengthen and help shape your weld. When using a filler rod, begin by creating a puddle where you want the weld to start. The rod should be about 10mm within the blowpipe flame and 2-3mm above the puddle. We place the rod above the puddle so it can be dipped in whenever additional metal is needed.
A good weld is hard to master and will come once you’re used to handling both the blowpipe and the filler rod For beginners, welding outside corner joints are great for practice and can be done without any filler rods. Be sure that the weld does not extend over onto any of the flat surfaces and the weld should be even penetration along the seam.
Shutting Down
Jobs done? Time to safely shut down the blowtorch. Start by closing down the blowpipe acetylene valve, followed by the oxygen valve. Repeat this step on the cylinder valve. After all the valves are closed, open the blowpipe oxygen valve to allow any remaining gas to drain out—you’ll know when this is done when the regulator gauge has fallen to zero. Repeat this step for the respective acetylene valves.
From here, a bit more learning is needed on things like understanding metal thickness, tip size, oxy-acetylene pressure and gas consumption rates. All of these topics are in-depth and are another stepping stone in understanding gas welding and gas welding equipment.
We recommend reading this extensive guide, provided by BOC Gas & Gear, to get a full understanding of gas welding. It even goes over the more advanced uses for gas welding such as brazing, oxy-fuel cutting and flame heating.
Need some new welding equipment? Browse through our available new and used welding equipment here.

