Machines4U Academy
13-Part Series To Help You Get The Most Out Of Machines4U
Module 7
How To Email Your Database In Minutes With Machinemail
Email marketing—you know you should be doing it, but how often does it fall in the too hard basket? Probably more often than you’d care to admit, and you’re not alone! Up to 30% of businesses aren’t doing email marketing, and those who are don’t do it regularly.
What if you could send your products directly to your customers in a matter of minutes? Would you dedicate 3 minutes a week to landing more leads?
Introducing: Machinemail.
In this article, you’ll learn:
- Why you and your team should be emailing your database
- How to create your own campaign with Machinemail
- What to include in your emails to maximise sales
- How you can easily send to different email lists
- How to determine the success of your campaign
- How you can quickly find your hottest leads
Why You And Your Team Should Be Emailing Your Database
If you’re not emailing your database, you’re missing out on a big opportunity to keep your customer base up to date, and your brand top of mind. According to a study from Marketing Sherpa (1), 72% of consumers actually prefer to receive promotional messages through email marketing. And in another study by Chief Marketer (2), 49% of B2B marketers say that email marketing has the best ROI of digital marketing.
Statistics like this show us email marketing is still a no-brainer for any size business. Email marketing is cost-effective, convenient and personal (if done correctly). And with Machinemail, you’ll see it can also be easy.
Step 1: How To Create Your Own Campaign With Machinemail
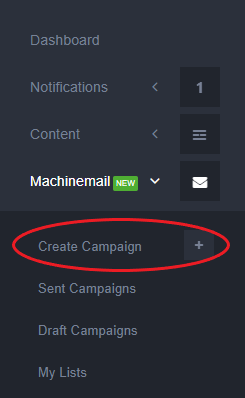
You’ll find Machinemail in your MyMachines4U dashboard. To create a campaign, simply hit the “Create Campaign” button and away you go!
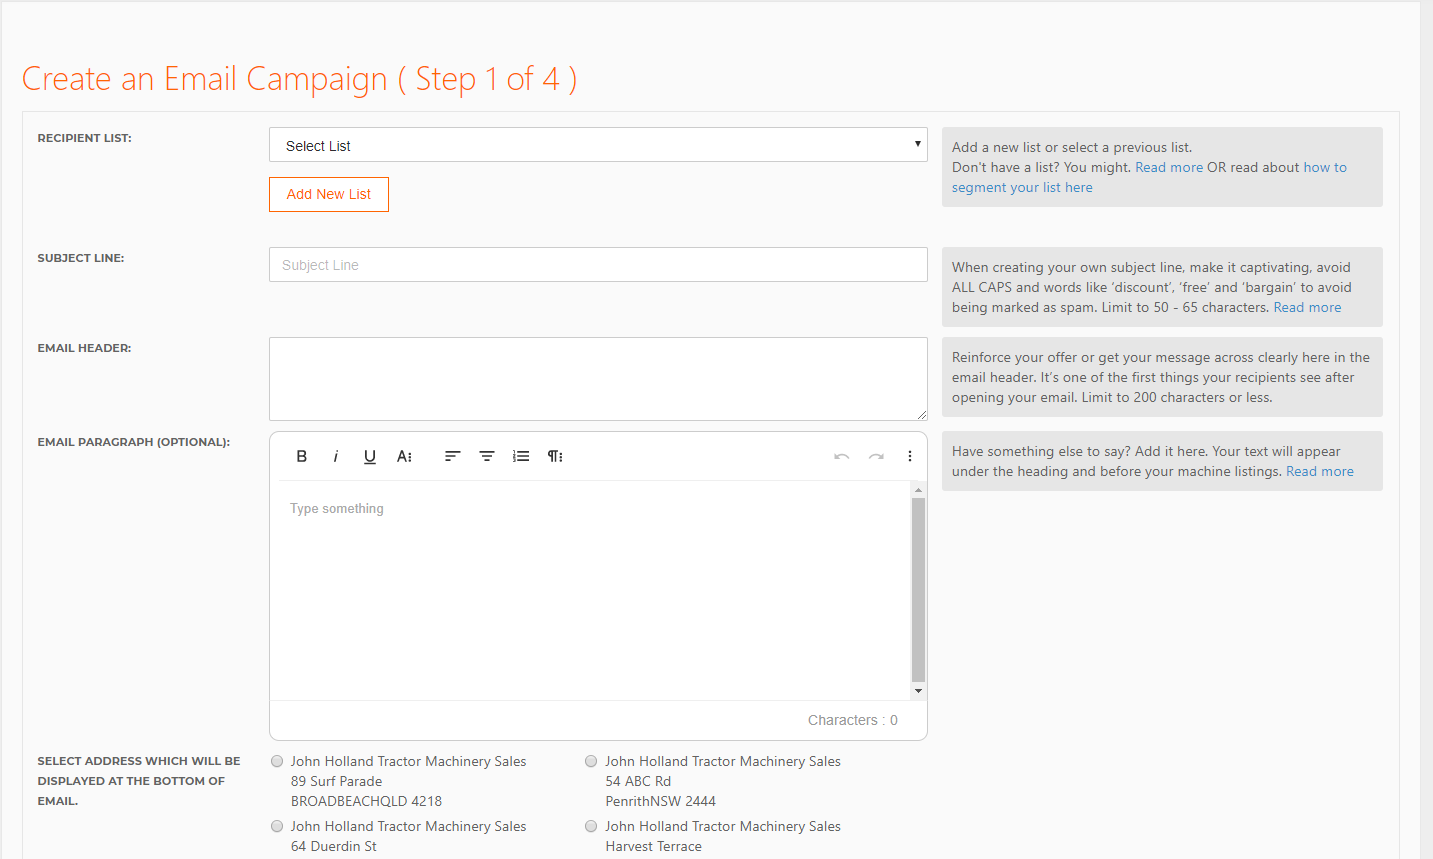
On this screen, you’ll see everything that you can include in your email, including:
- Recipient list (who to send it to)
- Subject line
- Email header
- Email paragraph
- Address
- Colour palette
- Hero image
- Layout
The handy tips and resources to the right-hand side of the screen will help you craft your emails. We’ll go into more depth on each section below.
What Content To Include In Your Emails To Maximise Sales
Subject Line
The email subject line is one of the most important parts of any email. It’s the main thing you should be using to drive people to click through and view your products. So in this example, we’ve used the subject line “April Used Equipment Specials”.
When crafting your subject line, you’ll want to make sure you avoid using words such as “Free”, “Bargain”, or any other language that could be classified as spam by email providers. This could see your email skip the inbox and land in the dreaded spam folder.
For more on email subject lines, click here.
Email Header
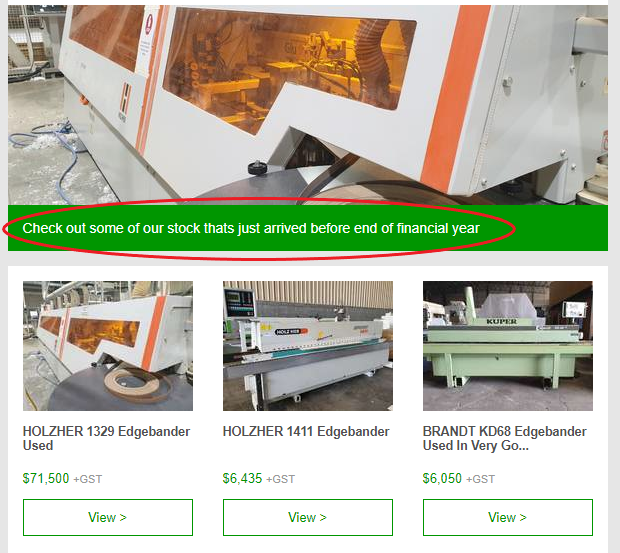
Your email header is a small paragraph that will be displayed above your machinery. This piece of text should get your message across clearly, as it’s one of the first things your customers will see after opening your email.
In this example, we went with “Check out some of the stock that’s just arrived before end of financial year”.
Email Paragraph
You can also add an email paragraph to your campaign. This would display underneath your email header, and before your machinery. This area is ideal for adding extra details about your event or special offer like the address and time of your event.
For more information on crafting email copy, click here.
Colour Palette

Scrolling down the page, you’ll see that you can select the colour palette for your email. This colour will generally default to your last used colour, but if you are selecting for the first time, there’s a few things you can do to get the right colour.
If you want to match your email colour to your brand, you can download free web browser extensions. For example, in this video we used Colorzilla, which is a colour dropper that will select the exact shade for your business to use online.
The built-in colour picker in Machinemail will allow you to guess your colour, but a tool like Colorzilla will provide you with the HTML colour code, which is more accurate.
The best part is, you only have to do this once! Machinemail will save your chosen colour until you decide to change it.
Template Design

At Machines4U, we’ve created a template suite for you to choose from when creating your campaign. These templates allow you to layout your machinery in a simple, clean design that is auto-populated using the machinery you select
Step 2: Getting Your Stock In Your Email
Selecting and ordering your machinery is simple with Machinemail. In Step 2, you can select your machinery from your current live listings on Machines4U.

Step 3: Arranging Your Stock
In Step 3, you can arrange the display order of items by dragging and dropping the machinery. Be sure to put your most in-demand machines at the top of the list.
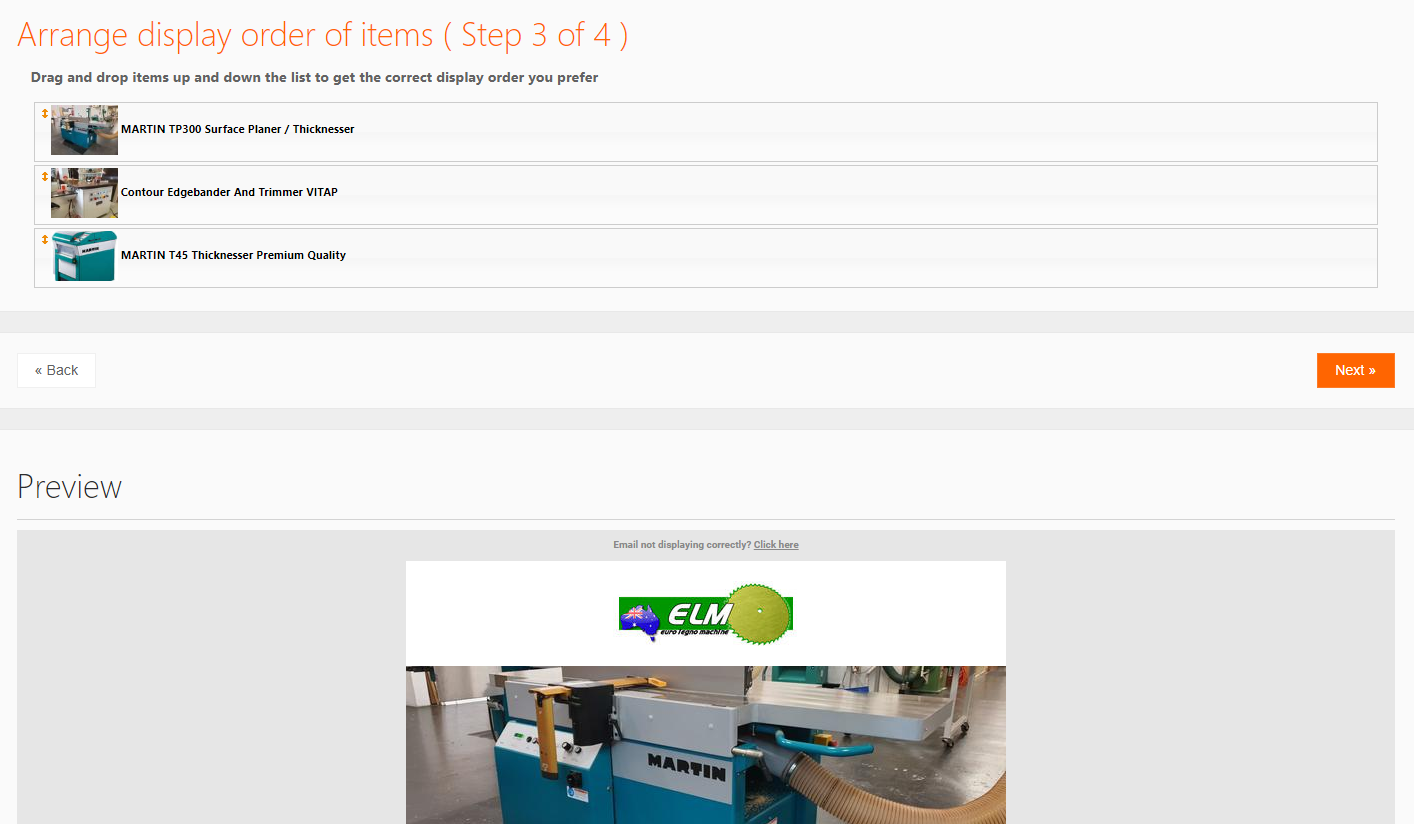
On this page, you’ll also be given a preview of your email. This preview gives you the opportunity to see exactly what your customers will see in their inbox. It’s a great way to double-check and go back and make adjustments before heading to the fourth and final step.
Step 4: How To Finalise Your Campaign With Machinemail
So, you’ve arrived at Step 4! You’re so close to finishing your campaign.

Sender Name
This page will allow you to add the “Sender Name”. Add some personalisation to your email by making your “Sender Name” a real person’s name. Emails with real names as the sender tend to perform better than generic sales@ or marketing@ email addresses.
Reply Email
You’ll also see the “Reply to Email” field. Here, you’ll want to include an email address, so that anyone who replies to the email gets sent to the correct person. It’s best to add your sales person’s email address in here, or someone who can quickly and easily handle leads and enquiries for you.
Campaign Title
Give your campaign a name you’ll easily remember in the future. With a simple title such as “Aprils Equipment Campaign”, you can easily refer back to it and see the stats later on.
Preview Text
Preview text is a small line of wording that will show up in your customers inbox underneath or next to the subject line. This is an optional field, but it is often used by mobile phone email clients.
Here are 5 tips for writing preview text to boost your open rates.
Test Email
Once you’re happy with your campaign, it’s a good idea to send through a test email to yourself, or up to 5 colleagues. This way, you can check how everything looks and spot any errors. You can send as many test emails as you like.
Read more about testing your emails before sending the rest, here.
Send Now or Schedule
In Machinemail, you have the ability to send your campaign now, which will send it within the next 15 minutes, or to schedule a date up to 2 weeks in advance. This is great if you want to sit down, create a couple of campaigns each fortnight and set and forget.
Once you hit ‘send campaign’, it’ll prompt you with a pop-up saying: “do you really want to send this campaign?” Click “Ok”, and tada, your campaign is on its way to your customers!
How You Can Easily Manage Different Email Lists
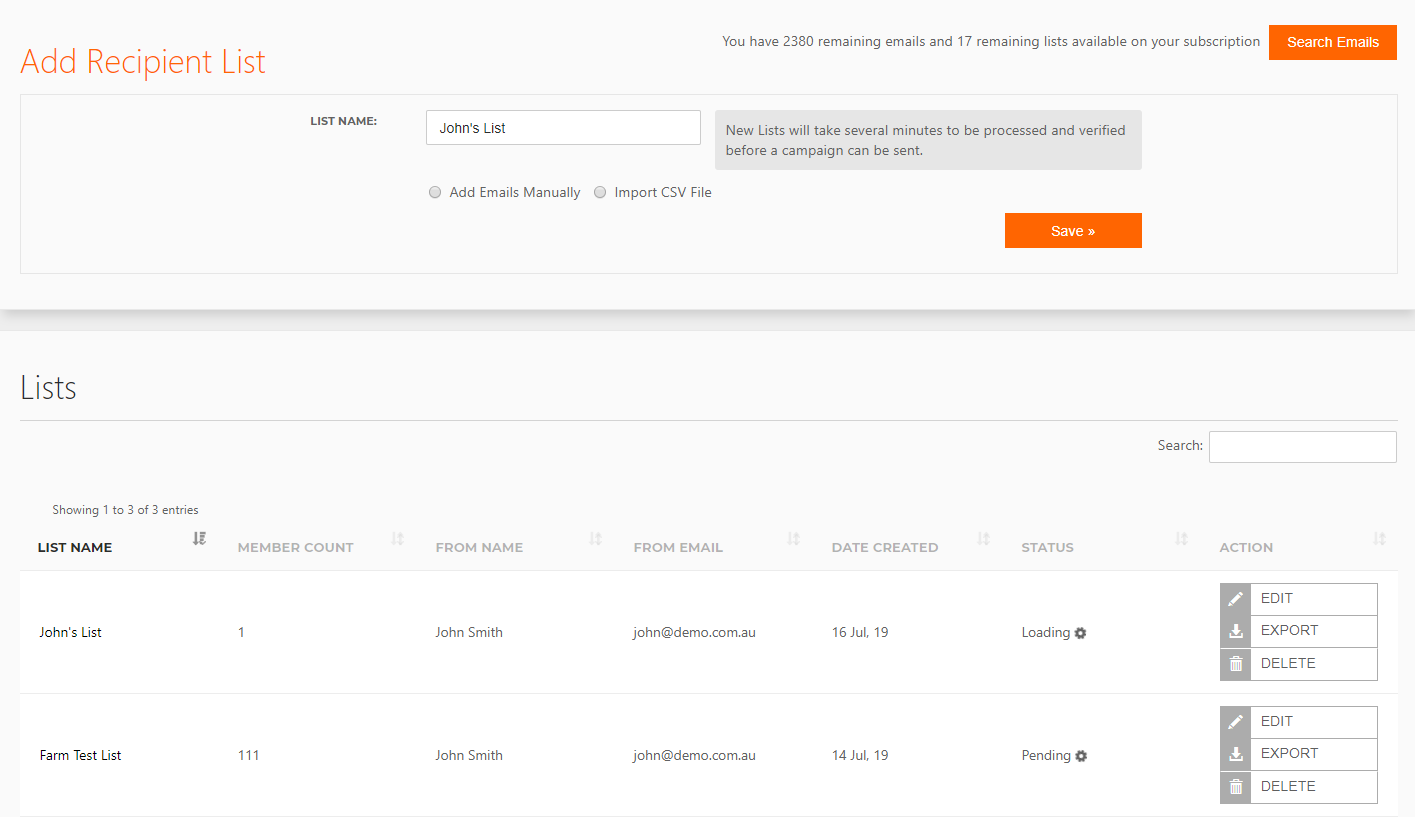
You’ll find all of your active lists under the “My Lists” section. From here, we’ve made list management as simple as possible. We recommend having as few lists as possible, so that you limit the time you need to dedicate to list management.
If you have too many lists, you’ll end up forgetting who is in which list, or worse still, you’ll stop using them altogether. So, it’s best to segment in to a few key lists. Some popular options for list segmentation include:
- Location
- Brand
- Machinery type
- Prospect
- Existing customers
Be sure to give your lists very clear and specific names, so you know which one to use! Not sure how to segment your list? Check out this article.
Importing emails
Machinemail gives you the option to add emails manually, or import them via CSV file. Adding your emails manually is a quick and easy option when you are updating an existing list with just a few new email addresses.
CSV file import is a great option if you are running a CRM or any other software, such as accounting software. You can export these email addresses and then upload the list in bulk, which will save you a lot of manual handling and, of course, time.
Learn how to export your email list here.
Unsubscribed emails
While it’s not what you want, unsubscribes do happen and they aren’t always a bad thing because it clears out those who aren’t quality leads. And to ensure you meet all email marketing regulations, we’ve made handling these unsubscribes simple. So simple in fact, you don’t need to do anything!
So, if anyone unsubscribes from your email list, Machinemail will automatically take them out . You don’t have to worry about removing them yourself. And, if you do accidentally add an unsubscribed email address, Machinemail will automatically remove them again.
If you want to remove anyone manually, you can search for their email address and it will bring up every list that contains it. This helps you ensure any customers who don’t want to receive your emails never get them again.
Want to know more about cleaning your email list? Click here. Or, if you’re not sure you have an email list, it’s likely you do! Check out this article to see how.
How To Determine The Success Of Your Campaign
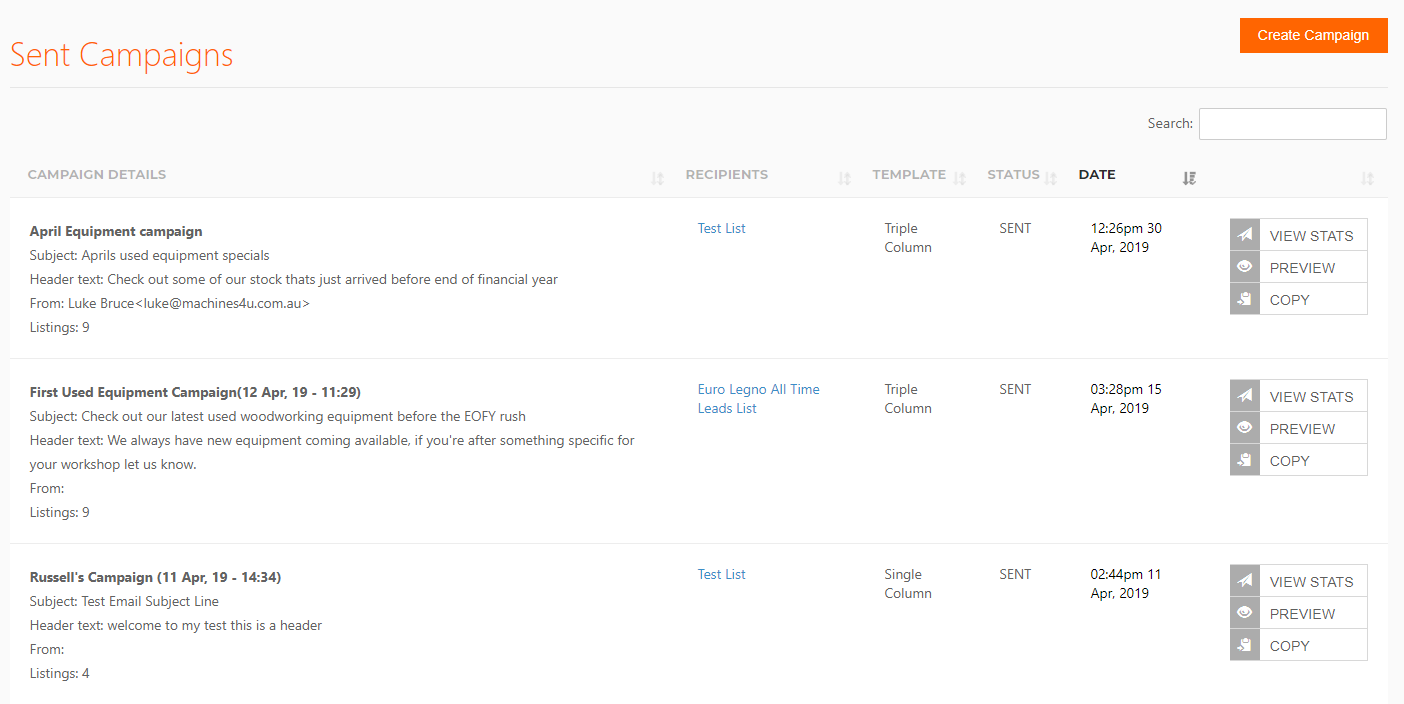
Once your campaign is sent, within an hour you’ll start receiving stats on how it’s going. You’ll find these statistics under the “Sent Campaigns” tab, which will show you every campaign you have sent. To see the stats on any particular campaign, you can click on “View Stats”, as above. Then, you’ll be taken to the Machinemail Campaign Report, which will show you all of the details of the sent campaign.
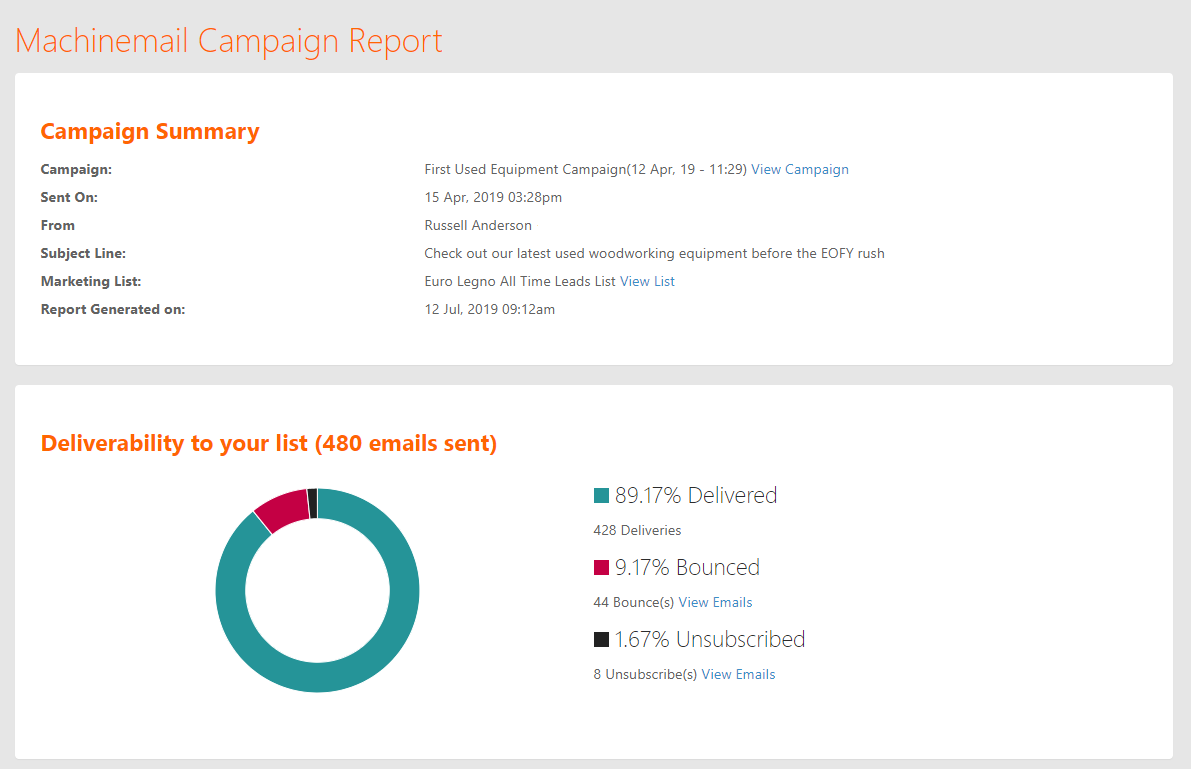
So, as you can see above, in the summary you’re given the:
- Campaign title,
- Date and time it was sent,
- “From” details,
- Subject line,
- List you sent the campaign to, and;
- Date and time the report was generated on.
After the summary, the first thing you’re given is the overall deliverability of your campaign. This pie graph tells you how many emails were delivered, how many bounced and how many people unsubscribed from your list.
Below this pie graph, you’ll find another 2 pie graphs showing the interaction you received for your campaign, including the open rate and click-through rate.
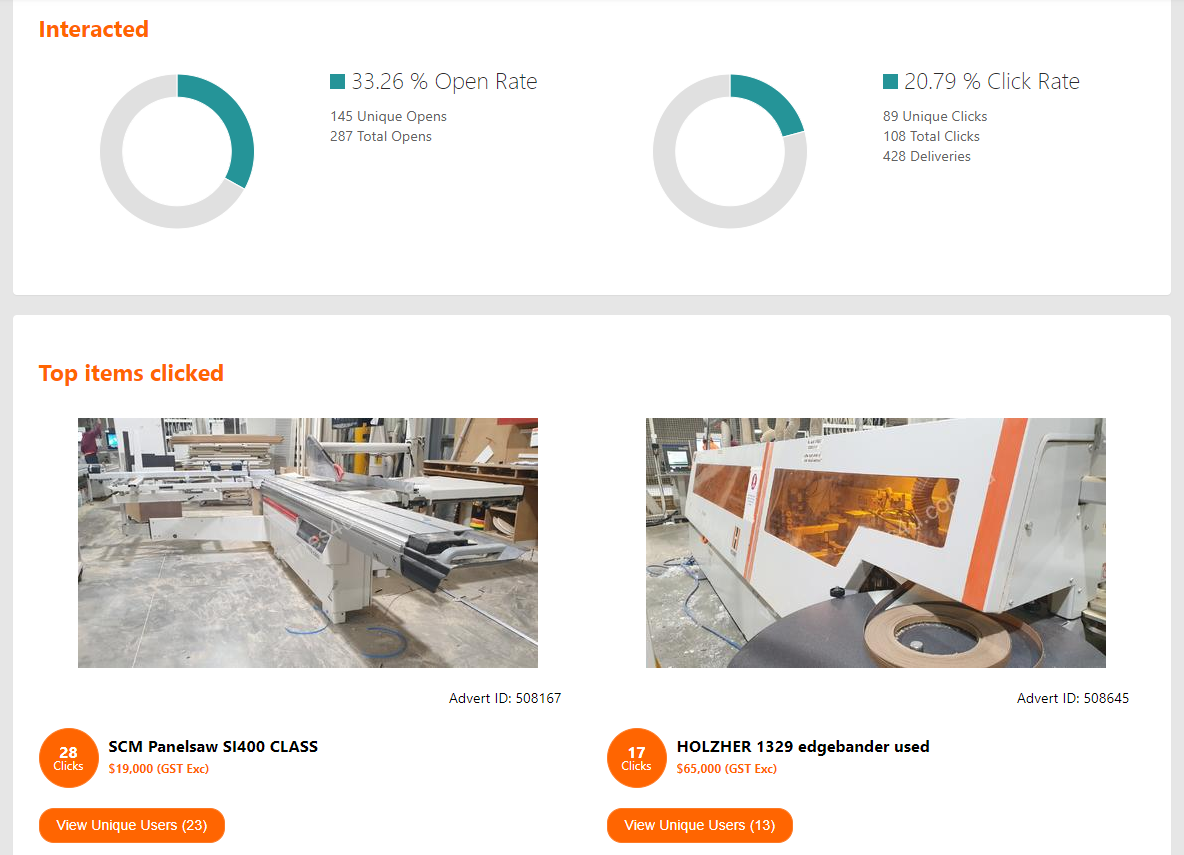
You’ll also find a section for “Top Items Clicked”, which we’ll go through in more detail below.
For more information for understanding your Machinemail report, check out this article.
How You Can Quickly Find Your Hottest Leads
The most valuable part of your entire report is the ability to see who has clicked on which machines. So, if you click on the “View Unique Users” button, it will bring up a pop-up as shown below.
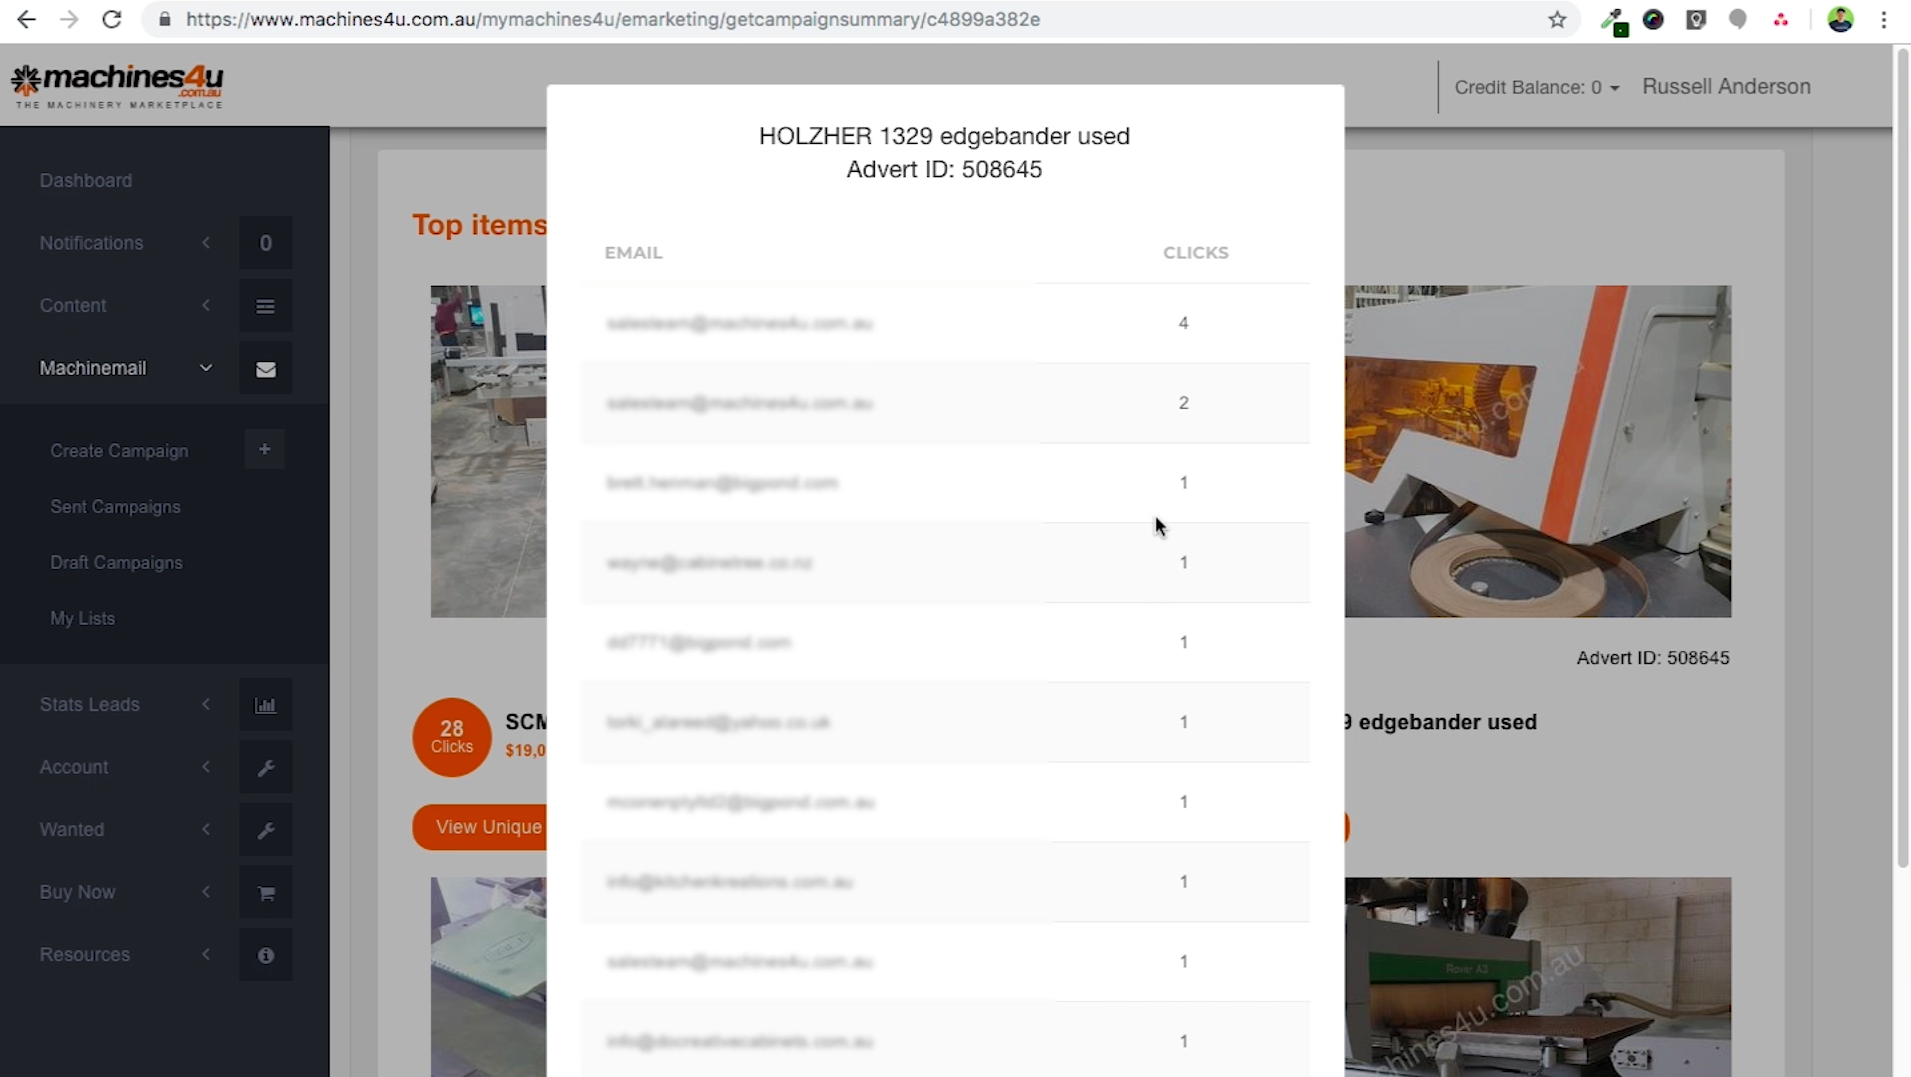
This box will give you the email address and number of clicks from each recipient. These email addresses and their clicks are really important, because it will give your sales team an idea of who is interested in what type of machine before they’ve even started putting leads through.
It’s important to note, you might see email addresses appear more than once. That’s because the email has either been forwarded on to someone who isn’t on your list, or it may have gone to a shared inbox (like a generic info@ email address), so it’s been opened on more than one computer.
As time goes on, you’ll see these numbers update. They are available from the first hour after you send the email, and you’ll get another update after 7 days, sent to your email address. Remember, the results that occur within the first 24-48 hours are going to be the most valuable, and anything that happens after 7 days is pretty negligible.
That’s everything you need to know about Machinemail.
Would a tool like this be useful for your business to quickly market your machines and make more sales? Contact your account manager for more information or a live demo.
In the next module, you’ll learn all about the importance of video and how it takes less than 5 minutes to make a great one.
Sources:
1 “Marketing Sherpa” Email Marketing Benchmark Report
2 “Chief Marketer” 2019, B2B Outlook Report

